
Developing on Windows with WSL
We look at some aspects of setting up a Linux-based development environment on Windows.
What gives?
I was recently issued a Windows machine for work. In an effort to get some parity between the development and production environments, my initial reaction was to setup a dual boot with Linux. However, after speaking with another developer who had more experience working in a Windows environment, I decided to give Microsoft's Windows Subsystem for Linux (WSL) a try. In this post I'll run through some of the steps that are either necessary or beneficial for such a workflow scenario.
Enabling and Installing WSL2
Before you take on this trek to the rather virtual Isle of Penguins on Windows, ensure that you have at least the Windows 10 update from May 2020 (version 2004) and a machine with Hyper-V virtualization support.
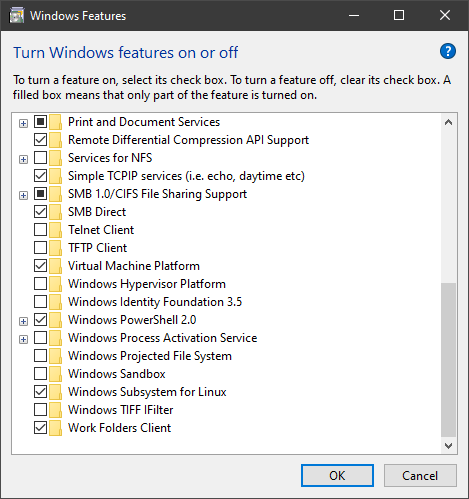
Microsoft has issued an updated version of their Linux subsystem (WSL2) which contains a number of improvements over the previous iteration. Installing WSL and upgrading to WSL2 can be done in a number of ways and Microsoft covers some of them here. While not mentioned in that article, you may also just use the "Turn Windows Features on or off" GUI to enable "Virtual Machine Platform" and "Windows Subsystem for Linux" — see the screenshot. Eventually you'll reach the point where you have to select and install a distro from the Microsoft Store. I went with an LTS version of Ubuntu.
Windows Terminal
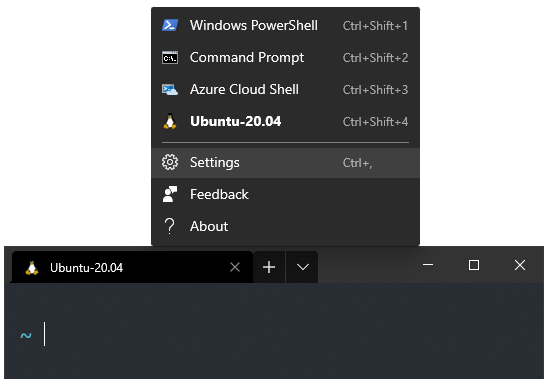
I must admit that not having used a Windows box in years I was pleasantly surprised at the progress they've made to make Windows more developer-friendly. The new Windows Terminal application is one such improvement that I value. You can install it from the Microsoft Store, and configure it with an accessible JSON file. It supports multiple shell types (Command Prompt, Power Shell, Bash), and each may be styled with a custom theme. If you're primarily going to be using a WSL shell (Bash or Zsh), then find the defaultProfile key and replace its value with the guid of your Linux distro profile - in my case that is Ubuntu-20.04. Next time you launch Windows Terminal your WSL shell will be the default.
Another thing that is useful is to change the starting directory for the shell. To change it to your home directory: "startingDirectory": "\\\\wsl$\\. Below is an excerpt from my settings file, you can find the complete file in this gist.
Somewhat out of scope for this article, but if you're curious, I typically extend the shell configuration with the Spaceship Prompt for Zshell (which zsh or apt-get install zsh). The fonts I often use for consoles or development are Hack and Fira Code. For Debian-based distros you can get them with sudo apt install fonts-firacode && sudo apt install fonts-hack-ttf. On the Windows side Hack has an installer, or you can just install and maintain the fonts manually.
{
    "defaultProfile": "{07b52e3e-de2c-5db4-bd2d-ba144ed6c273}",
    "copyOnSelect": true,
    "profiles":
    {
        "defaults":
        {
          "hidden": false,
          "fontSize": 15,
          "closeOnExit": true,
          "useAcrylic": true,
          "acrylicOpacity": 0.9,
          "snapOnInput": true,
          "padding": "15, 15, 15, 15"
        },
        "list":
        [
            {
                "guid": "{61c54bbd-c2c6-5271-96e7-009a87ff44bf}",
                "name": "Windows PowerShell",
                "commandline": "powershell.exe",
                "colorScheme": "Solarized Dark",
                "fontFace": "Fira Code"
            },
            {
                "guid": "{07b52e3e-de2c-5db4-bd2d-ba144ed6c273}",
                "name": "Ubuntu-20.04",
                "source": "Windows.Terminal.Wsl",
                "startingDirectory": "\\\\wsl$\\Ubuntu-20.04\\home\\gideon",
                "fontFace": "Hack",
                "colorScheme": "One Half Dark"
            }
        ]
    },
Node & Git
I'm not going to cover these in detail as there are already plenty of good fodder on installing these on WSL. Microsoft's documentation on installing Node and nvm should get you across the finish line.
While your Git setup is the same as on a native Linux box, your host-side code editor might convert LF line feeds to CRLF if the project originated in a Linux environment. This could hit you out of left field as once you're ready to stage your work. Git was nice enough to warn me about the line ending conversion when I staged my work so I was able to fix it before committing. To solve this issue, either set the appropriate flag on Git's global configuration, or add a .gitattributes file to the root of your repo.
# Linux/Mac — convert CRLF to LF on commit
$ git config --global core.autocrlf input
# Windows — convert LF to CRLF on commit
$ git config --global core.autocrlf true
# Let Git decide if the file is text or binary,
# and then direct line endings to be LF on commit.
* text=auto eol=lf
Code Editors and IDEs

Users of Visual Studio Code will benefit from a plugin that was specifically developed for working with a WSL setup in VS Code.
As a WebStorm user I had to do some extra tweaking. Since the IDE is running on a case-insensitive host, it gets rightfully confused when your project's assets are actually located on a file system that is sensitive to casing. You'll receive the "Filesystem Case-Sensitivity Mismatch" warning in short order. The workaround for this is to open the "Help" menu and select "Edit Custom Properties". Then, add the following on a new line: idea.case.sensitive.fs=true.
Shortcuts
You'll want to explore your WSL instance using Windows Explorer at some point, and it helps to have shortcuts to the directories you frequent on your Linux VM. If you open File Explorer, type \\wsl$ to get into your distro's root. From there you can create shortcuts that's accessible in your Favorites sidebar or Desktop and so forth.
Closing Thoughts
I've been developing on Windows with my WSL2 setup for about two weeks. The better driver support for my machine, a working fingerprint reader and a laptop that will actually wake up from a sleep cycle without any additional tweaks, as well as a more polished GUI are all reasons why I have so far stuck with the hybrid platform approach. On the downside, I have noticed some significant performance issues with WebStorm attempting to watch and index project files on the VM, subsequently coming to a ~5 second freeze from time to time. I'll monitor the situation and might decide to try VS Code if WebStorm does not improve their WSL game soon enough.
It will be interesting to see to what extent Microsoft will continue to support embedded Linux, however much every move in that direction tacitly concedes the developer trophy to Linux. Nevertheless, kudos to Windows leading the charge in making a competing OS a native citizen and thereby expanding its multiplatform development capabilities.